Be yourself; Everyone else is already taken.
— Oscar Wilde.
This is the first post on my new blog. I’m just getting this new blog going, so stay tuned for more. Subscribe below to get notified when I post new updates.
Be yourself; Everyone else is already taken.
— Oscar Wilde.
This is the first post on my new blog. I’m just getting this new blog going, so stay tuned for more. Subscribe below to get notified when I post new updates.
Similarly, that photograph altering programming can send out your pictures in various document organizes, your gadget (aside from little section level compacts) enables you to pick among Raw and JPEG. Yet, before I see which is the best decision for you, I will begin by disclosing to you what are the fundamental contrasts which exist between these two configurations.
The RAW organization (which implies crude in English) is the local configuration, the crude picture of an apple from the sensor of your computerized camera. It is the computerized negative of your pictures.
To comprehend what this compares to, we should perceive how the chronicle of pictures in Raw organization happens with this case of a photograph taken in high contrast during the shooting:
We decide both the shooting and computerized settings wanted for the shooting (here in highly contrasting).
The photons caught by the sensor are converted into advanced information and afterward transmitted to the gadget’s processor.
The processor deciphers the computerized information transmitted at that point applies the settings picked by the picture taker (high contrast in our model).
The advanced document is saved money on the card in crude arrangement with the high contrast transformation data embodied inside the record itself (somewhat like Russian dolls). The photograph that you at that point see on the screen of your camera is, in this manner, the picture translated and handled by the processor of your gadget. It is fine in highly contrasting however the shading data is constantly accessible.
All data recorded by the sensor is held. This is the crude contention of the Raw. In this way, it offers an enormous adjustment limit in modifying your photographs (you can for instance emphatically right the introduction to uncover the subtleties in the shadows or the features).
Changes to the picture are reversible. To comprehend this point, you should realize that a Raw document can’t be changed (well truly, else it won’t be called Raw in addition to any longer). The repairs made to the picture are along these lines not recorded in the Raw document itself however in a little document of a couple of kilobytes which is made consequently when we alter the photograph ( see my article on .xmp ). The product then just needs to peruse this document to see the rundown of changes made to the picture. With this framework, it is subsequently simple to return in time and to change a phase of the acknowledgment whether fundamental.
It very well may be changed over into a large number of record positions (TIFF, JPEG, PNG, PSD, DNG… ).
Crude records are better and better handled by programming since editors are always improving the nature of the created calculations for Raw documents (control of computerized clamor or subtleties in shadows and features).
Pictures can be prepared in 16 bits which is a favorable position for the individuals who need a noteworthy shading profundity in their photograph altering work.
Since the white equalization isn’t fixed, it is anything but difficult to address a shading cast.
It is an enormous document. For data, a photograph of 18 million pixels is 25 MB. It is, in this way, important to design a resulting stockpiling framework to confront every one of the pictures that you are going to take. Besides, the PC should likewise be incredible to permit genuinely quick handling of pictures.
It is a restrictive arrangement. Every producer has its crude document design (CR2 for Canon, NEF for Nikon, PTX for Pentax, and so on.). More regrettable, producers have one sort of Raw configuration per gadget. There is a standard crude document group, DNG, be that as it may, aside from a couple of producers (ex Pentax), it has not yet been locally incorporated on gadgets. In this way, we can genuinely think about what will befall these many organizations that will coincide in a couple of years …
Because of its exceptional structure, numerous product programs are not ready to peruse Raw documents.

It is an unusable arrangement for what it’s worth. You need to experience a transformation organize ( we talk about improvement, derivatization or demosaicing ) to have the option to share your photographs, regardless of whether you would prefer not to finish them up.
Numerous photographs should be corrected. To be sure, these are marginally underexposed and blunter than the JPEG position (see clarifications in the accompanying part). Taking photographs in Raw is in this manner tedious because you possess to permit energy for each picture before your PC.
The Raw arrangement doesn’t bolster layers. Therefore, the potential outcomes of photograph modifying are constrained to beautification tasks. To make a photomontage it will be important to conceive a transformation of your photograph in another record group.
The shading and tone settings applied by your computerized camera (immersion, differentiate) can’t be perused by ordinary programming. Just those given by the maker of your APN can peruse this data epitomized inside the document. If I take the case of the photograph in highly contrasting, it will show up in high contrast on the product provided with your gadget however will be shown in shading in programming other than that of the maker since this outsider programming can’t peruse the modifying tasks included by your APN in the Raw document.
The number of pictures that can be recorded persistently is restricted. This is connected to the huge record size because, after a specific number of photographs, the gadget needs a minute to spare every one of the information on the card. It is additionally thus that the edge rate (the number of pictures every second) is lower than in JPEG.
The product (drawers) must be always refreshed. On the off chance that for instance, you purchase another camera and you have a product whose form is sooner than the discharge date of your camera, you won’t have the option to peruse the documents created by your APN. Why? Just because your gadget has its Raw document and the distributors need to refresh their product to enable them to be perused.
It doesn’t fit documenting. There are such a significant number of various Raw organizations that we can abruptly genuinely think about what will befall these many arrangements that will exist together in a couple of years … For sure, if a supervisor concludes that such or such Raw organization, for instance, quite a while old no longer should be bolstered in the most recent rendition of the product, and you will never again have the option to utilize it.
The JPG or JPEG (Joint Photographic Expert Group) position is a standard in advanced imaging. Here, it’s something contrary to Raw since it is a lossy compacted design. To take a model, I would state that it is what could be compared to MP3 in music.
To comprehend what this relates to, we should perceive how the account of pictures in JPEG group goes with this new model:
We decide both the shooting and computerized settings wanted for the shooting (here in high contrast).
The photons caught by the sensor are converted into computerized information and afterward transmitted to the gadget’s processor.
The processor translates the computerized information transmitted, advances the picture, applies the settings picked by the photographic artist (highly contrasting in our model), produces a JPEG rendition of the picture at that point erases the crude information from the sensor (the celebrated Raw record).
At last, the picture in JPEG design is saved money on the card in highly contrasting. The photograph that you at that point see on the screen is, hence, the picture handled by the processor of your gadget. The shading data is lost.
The records are little because of pressure (at a similar size, you put at any rate multiple times more photographs on your card than with the Raw).
It is an all-inclusive organization that is perused by totally all photograph altering programming and computerized gadgets. In this way, the photographs are quickly shareable. You can send them straightforwardly to the picture taker or distribute them on the web without experiencing an improvement/modifying stage.
The pictures are all the more complimenting. The impact, as should be obvious in the model beneath, the JPEG photograph is somewhat more differentiated and better uncovered. Why this distinction? Just because to make the photographs quickly usable, the camera plays out a slight enhancement/modifying of the crude picture.
Because of its decreased weight, the quantity of photographs that can be taken in burst mode by your gadget is higher and the casing rate more supported than in Raw arrangement.
Its modifying potential is lower than that of the Raw organization. This is effectively clarified by the way that JPEG pressure is finished with misfortunes. There is along these lines at last fewer data in the picture. We can, in this manner, move the cursors of the correcting programming less without gambling debasing the picture.
The potential outcomes for redressing the white parity are restricted since it was at that point fixed when making the JPEG.
The picture styles picked during shooting can’t be dropped. On the off chance that for instance, you choose to take a highly contrasting photograph, you won’t have the option to come back to the shading variant in post-handling.
JPEG and Raw are in this manner restricted. At last, everything will rely upon the kind of picture taker you are. We can outline the circumstance as pursues:
You show restraint, you have time and you love to mess with little programming cursors to draw out the best in your photographs: embrace the Raw configuration.
You would prefer not to set aside the effort to modify the entirety of your photographs, you are constrained by time and you are completely happy with the crude documents conveyed by your gadget: JPEG is for you.
It will likewise rely upon the utilization you need to make of your photographs.
Also read more,
Cut out pictures from background administration is a genuine picture altering administration relying upon foundation expulsion administration, cutting way administration, veiling administration, modifying.
Tag:
# Image retouching Image masking
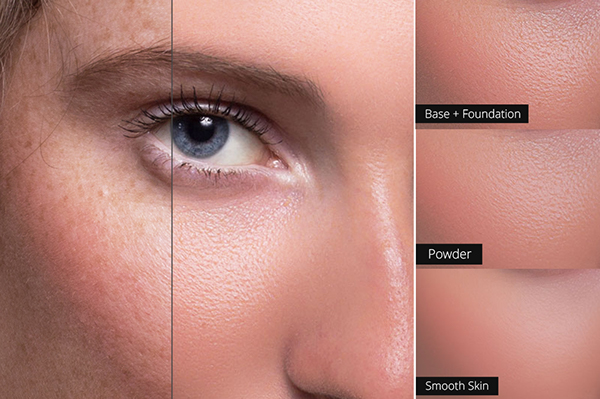
To reap this superb transformation, it’s far vital to apply a software program that manages the layers and provided with a characteristic allowing them to create caricatures. To illustrate this tutorial, we can use Photoshop factors and, as you will see, many capabilities might be used (simply to get familiar with this software program…).
To convert your portrait right into a vampire, view the video educational or comply with the 6 steps offered underneath:
In this first step, you will use the filter out to create caricatures to regulate the form of the ears and tooth.
Apply the Fluidity filter out to the picture to adjust (filter> Distortion> Fluidity…). In the new window that appears, take the hand-formed icon (deformation tool) then decide the thickness of your tool (the conversation field at the proper). All you need to do is bypass the device over the preferred regions to point the ears of your problem and convey up the dogs. In case you are not happy with the result, do not hesitate to apply the Reconstruction device positioned underneath to reduce or do away with the effect.
Verify with ok when you are satisfied with the result acquired.
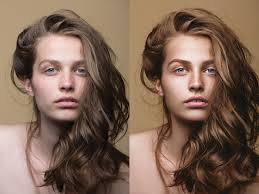
You will now reproduction hair on the pinnacle of the skull to factor it on the forehead.
Take the Duplication Buffer tool, decide the diameter of the tool then role yourself on a place in which there may be hair. Now press the alt key to signify to the software the supply location to be copied. Now virtually bypass the device over the area to acquire the hair.
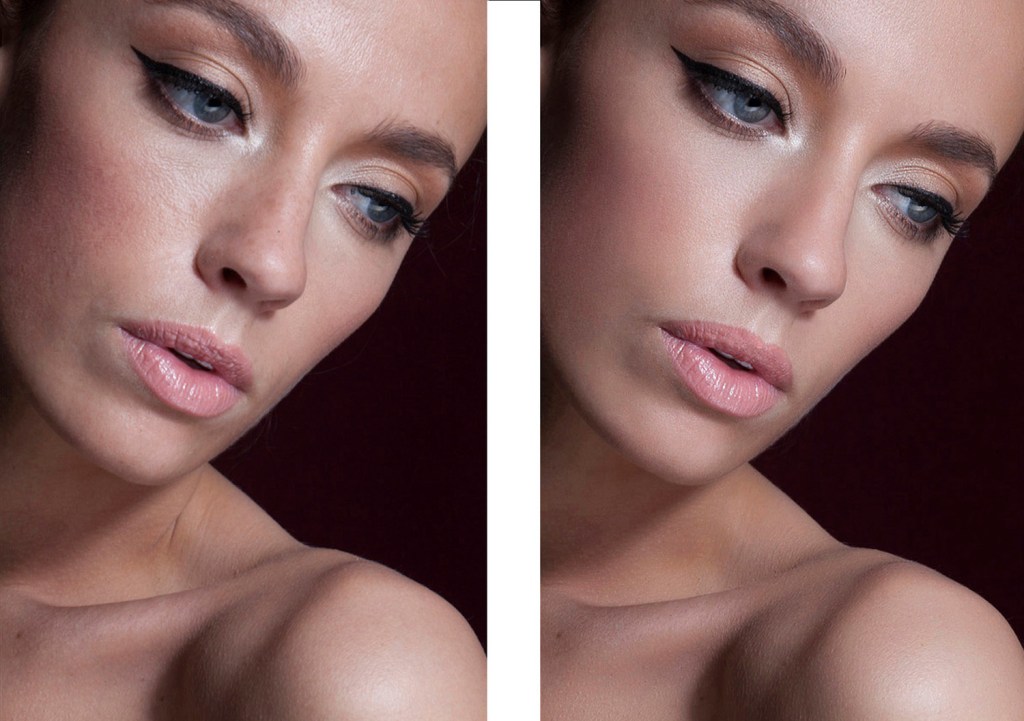
This step is a touch extra technical as it makes use of adjustment layers. The gain of this system is that you could alternate the advent of the eyes and skin at will. To recognize how the adjustment layers work, it’s miles essential to know what a fusion mask is.
Begin by way of adding a Hue / Saturation adjustment layer (Layer> New Adjustment Layer> Hue / Saturation…).
Play with the Hue and Saturation sliders till you locate the attention shade it truly is proper for you. As you could see, the whole photograph has modified shade.
Take the Paint Bucket device, pick the black coloration, click on the white rectangle of the adjustment layer (to choose it) after which in your photo. The impact of the Hue / Saturation layer is no longer visible due to the fact its miles hidden by using the black rectangle.
Finally, take the comb tool, pick the white coloration, click on blurred rounded (1), decide the size of your brush (2) then set the opacity to a hundred% (three). Now bypass the comb over the eyes. The color becomes chosen in advance reappears, however handiest on the eyes, that’s higher (nicely, it rhymes :-)…)
The change in pores and skin shade follows the same principle as for the eyes, specifically that you may again use the adjustment layers.
Start with the aid of including a Brightness/contrast adjustment layer to lighten the skin (Layer> New adjustment layer> Brightness/evaluation…).
Play with the Brightness and assessment sliders until you get the skin tone you need. Of path, as for the retouching of the eyes, the whole picture becomes modified. So make certain to cognizance at the pores and skin tone most effective.
Take the Paint Bucket device, pick the black coloration, click on the white rectangle of the adjustment layer after which on your image. As earlier than, the impact of the Brightness/comparison layer is no longer visible due to the fact it’s far hidden employing the black rectangle.
Use the brush tool as for the eyes to reveal the brand new color of your skin (do not forget to interchange to white!).
Add a second Hue / Saturation adjustment layer if important to achieve the cadaverous impact of the pores and skin.
In this situation, I used 2 adjustment layers to cast off the dominant crimson present at the unique photo
On the primary adjustment layer (Brightness/evaluation), I flatly reduced the comparison to -50 and driven the brightness to +20.
On the second one adjustment layer (Hue / Saturation), I modified the brightness (+20) in pink tones.
To deliver out the lips, it’s miles essential to intensify their color. The method used right here is to color red on a new layer (obvious) and play on its opacity so that it suits well into the composition.
Upload a brand new layer (Layer> New> Layer…). Call it “Mouth” then set its opacity to fifteen%.
Photoshop factors layer window
Pick a shade in crimson tones (you could use the eyedropper tool to pick out the unique color of your lips).
Take the brush device, determine its thickness, go to the obvious layer you simply created and then iron the coloration at the lips. Use the eraser tool if you overflow.
Trade the opacity of your layer to regulate, if vital, the depth of the result. In case you wish, you can additionally play at the layer’s mixing mode and switch it to color mode.
We are almost there… allow’s tackle the dark circles now. To do that, we can use a neighborhood modifying tool.
Take the Density + tool, decide its length and exposure. Be sure to choose a low value (around 5%) as this tool may be very effective and it’ll blacken your eyes right away.
In reality, run the tool around the eye place.
That is the ultimate step. Drawing sensible blood isn’t always smooth. That is why it’s far pleasant to make your blood and distribute it over your face and body. The impact could be a whole lot more putting.
For folks who don’t want to get their hands dirty, right here’s how:
Upload a new layer (Layer> New> Layer…). Name it “Blood”.
Pick out the blood-crimson shade. Placed # 600000 within the hexadecimal code similar to the coloration.
Photoshop elements color window
Take the comb tool, pick an incredibly thin thickness (5 px as an instance) then draw the blood flowing at the face.
Give comfort to your blood via applying a fashion to it (Layer> Layer style> fashion Parameter…). In the dialog field that opens, pick the Beveling option and Downwards then validate.
Gently blur your blood by using making use of the Blur filter (filter> Blur> Blur).
Also read more,
We give advance Photoshop image masking administration for complex hair, hide picture foundation expulsion. Beginning value $0.40/picture. Get Quote for Next task.
Tag:
As a result, the workspace is completely one-of-a-kind from conventional software program. They have two foremost tabs:
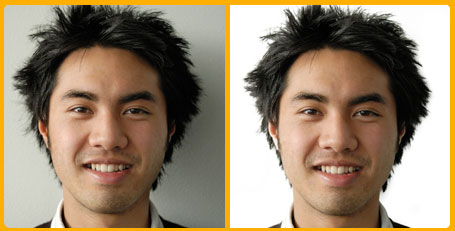
The first one allows dealing with its library of images. Photos are represented as thumbnails. This is greater like a light table on which we view all of its images (see screenshot). Then just double click on the thumbnail for it to seem in full display screen.
The second one lets in us to perform the paintings of retouching. The decided on photograph is displayed in a massive length. Corrections are then made by way of moving the sliders. Some tools can despite the fact that be gift however they are summary and lots much less numerous than in software based totally at the management of the layers.
Other features may also be present consisting of face popularity, the potential to create slideshows, books, to geotag its photographs or to create photo galleries for its internet site.
As a end result, the processing method is completely special from the preceding category:
We import, type, become aware of its photographs and we choose the only we want to retouch
It is modified through the correction of the publicity parameters, the colours and/or by acting regionally on the image by way of equipment of retouching
The retouched photograph of the library is exported to use the adjustments to the exported photo.
The gain of this system is that you may go back at any time to the original version of the image this is never modified (or intermediate variations). This is why we speak approximately non-destructive enhancing.
This form of software is consequently favored for individuals who wish to manipulate their library of pix, paintings their pics in batches and make the maximum of the ability of retouching their pictures without losing the original photograph.
Of course, these kinds of software program are complementary. It is of path pretty feasible to increase and decorate his pix after which retouch to create photomontages. In this case, it is going to be vital to offer software from each class.
These are programs which are grafted on any other software belonging to one of the two categories provided above. Plugins cannot work alone. Just a click on to interchange from the host software to the plugin and vice versa.
Because in their layout, they are extremely-specialised in a specific field (eg LrTimelapse to make Time Lapse via Lightroom or HDR Efex Pro to make HDR thru Photoshop, Aperture or Lightroom). They add innovative capabilities to the host software.
This form of program is consequently reserved for an audience of connoisseurs. In addition, their price is normally excessive (it may even in some cases be better than the price of the host software).
As for the plugins these are ultra-specialized in a selected discipline. The difference with the preceding class lies inside the fact that these programs are designed to work on my own.
Here, there may be something for all tastes and all budgets (loose, paid, for the tablet, professionals or beginners …) which explains why it is very hard or impossible to attract a comparative desk as the offers are unique ( HDR, Pan, Black & White, Perspective Correction, etc.).
Also, word that a few publishers have advanced several specialized software that they offer as a suite. The person has the opportunity to collect all of this software that has the gain of perfectly cohabit between them. Here are the most famous:
The Nik Collection of DxO (Windows and macOS).
The DxO Photo Suite consisting of DxO FilmPack and DxO ViewPoint (Windows and macOS).
The Skylum Creative Kit (MacOs).
Here is the closing class. These packages paintings via your net browser and are consequently unfastened. As you could imagine, the retouching opportunities are very basic and, as such, they may be greater for beginners. This answer is greater to apply to have fun than to simply retouch his photographs. Here are a few :
Photoshop Express Editor: Online model of the well-known Photoshop
Tiltshiftmaker: growing version pics
Photo: picture editor
Makeup: touching faces
Kizoa: creating frames, clear out effects and morphing
Photogram: bundles 3 on line software. It’s as much as you to pick the only pleasant appropriate in your desires
Canva: crop, rotate, apply filters and tone correction
Well, sufficient blah, here are the precis tables corresponding to the primary classes. FYI, I ranked the software program alphabetically (no favoritism despite the fact that I actually have my preferences …). In each desk, you will discover facts about the type of consumer (novice, beginner, expert), their price in addition to their strengths and weaknesses. For this newsletter to be beneficial within the destiny, I will try to replace this table over time. Do no longer hesitate to come back returned to this web page every so often.
I intentionally unnoticed a probable ranking or rating fashion “listing of 5 nice image editing software” because it’s miles for me some thing a great deal too subjective. The satisfactory software program for you, won’t be the satisfactory for me. The fine software program is genuinely the only that pleasant fits your wishes.
As you could see, you’re spoiled for desire …
Last however no longer least, do not hesitate to download the (loose) assessment variations of the software program you are inquisitive about (commonly 30 days of use). Test in 2 or 3 of the equal category, no greater. Take the time to evaluate them, read the articles that present this software in element.
If you are searching out complementary software program to the only you already have, read this other article about the proper number of software program which you need to have in photograph editing.
Still hesitating? Examine what’s the most famous photo editing software program thru my little statistics on the software conduct of site visitors to this web site (the consequences are expressed in%).
Also read more,
Proficient Image retouching administrations will make your pictures fly in print and on the web. Get a statement for your next task today.
Tag:
I’ll say, earlier than we begin there are three methods to create a time lapse beneath Light room (Lr):
The first (simplest) is to apply completely Lr to modify its photographs and export them in video collection. This is the method that I element in this article.
The 2d is to apply a plugin (Lr Tim elapse) and to navigate between this plugin and Light room to make a video of a totally high visual first-rate (I communicate fast on the quit of the item).
The 1/3 is to apply Lr to edit and export pictures and to use third-celebration software to bring together the video.
I do not go back to the definition of Time Lapse and the shooting parameters due to the fact they’ve already been developed formerly. So here we are: you have got your snap shots and you are about to import them into Light room.
Know, before going similarly, which you need as a minimum version five of Light room.
But, earlier than uploading those snap shots and growing your Time Lapse, you may should continue with a small template addition in Light room. A temp … What? Yes, sorry, the photo is a bit like advertising, many terms are in English.
In Light room, a template is surely a small record grouping numerous movements. It automates a procedure glide. This is the equal of the macro in Excel or actions in Photoshop.
Since Light room does not naively comprise predefined templates to export its pics in 24 frames / 2nd movies, you’ll need to add it yourself.
To do this, down load the template from mild room-weblog.Com with the aid of clicking on Download Slideshow Template.
Once the report is downloaded and unzipped, begin Light room, then go to the Slideshow module. From there, go to the Template Browser (on the left side of the screen) and right-click on User Templates. Finally, click on Import … To import the template (with the extension .Template) that you have simply downloaded. There you go ! It truly is all. The new user template now seems in the list. Everything is now OK to create your first Time Lapse video.
Light room Slideshow Module
Retouch your first picture inside the collection (exposure and colour correction, cropping) and
observe through synchronizing settings, changes to the whole series of pictures.
Import the song and export the sequence in MP4 format.
NB : the video underneath turned into made with templates which might be not downloadable nowadays but the realization precept is precisely the same. The only difference is that whilst you export, you’ll no longer be able to pick out the variety of frames in keeping with second. Only the selection of the dimensions of the video is possible.
If you need to move similarly within the consciousness of Tim elapses underneath Lr, I can simplest endorse you to visit the website online of Gunther Wigner and down load the plugin he created for Light room (from model 3 for Mac / PC). If you grasp English or German and need to improve in this type of results, this is the website online to have in his favorites …
This plugin exists in a free shape (sequence of 400 pix) or paid (limitless range of images of path). This one will can help you dispose of among others the effects of flickering (and yes, nonetheless of English!), Ie the flickering that there’s while the conditions of mild vary.
Also read more,
We give advance Photoshop image masking administration for complex hair, hide picture foundation evacuation. Beginning value $0.40/picture. Get Quote for Next undertaking.
Tag:
As you read in the title, this instructional exercise will come in two sections:
The principal, very basic, which will enable you to see how to utilize the layers to put your photographs on different photographs. This activity is accordingly open to apprentices.
A second, progressively unpredictable, or you will utilize combination covers to incorporate a face on the body of a creature.
Here is the technique to apply to place a photograph in another photograph. I said that it is a similar whatever product you have. Just necessity: your product must have the option to deal with the layers .
import the two pictures to be converged into one and a similar photograph on two unique layers.
ensure that the photograph with the face is very much situated throughout the subsequent photograph (the stylistic layout).
move and resize the photograph with your face so it is superimposed impeccably with the photograph on the lower layer. In the event that essential, bring down the obscurity of the layer to make this activity simpler.
Eradicate the regions around the picture that you would prefer not to show up on the finished edition. Make certain to pick an eraser with a dynamic framework.
adjust, in the photograph including the face, the distinctions of difference, brilliance or shading that can be between the 2 photographs. For this, you can utilize the modification layers or straightforwardly change the layer including the photograph to alter.
use, if vital, restricted altering apparatuses to completely incorporate your face with the remainder of the photograph (cushion instruments, corrector, thickness +, thickness – …)
I indicate that you can include the same number of layers as you need in your photograph montage. The working strategy remains carefully indistinguishable.
Here are 2 recordings that set in motion the technique depicted over: the first was finished with Photoshop Elements and the second with The Gimp .
take pictures that go well together. It’s a given, yet in the event that the image you need to place your face in front, snap a photo from the front. The more the photos get hitched together, the better the final product.
focus on the nature of the photograph. An excellent motion picture publication related with a hazy picture taken with your cell phone will never give a persuading result.
likewise focus on the size of your photographs. It ought to be remembered that the size of your face ought to be at any rate equivalent to the face on the source photograph. Else, you should expand your photograph which will be pix thrilled (except if you can diminish the size of the picture with the stylistic theme).
Try not to stop for a second to connect a shading photograph with a highly contrasting photograph. For this situation, make certain to regard the 3 guidelines expressed previously.
Also read more,
Clippingphotoindia is an expert photograph altering administrations organization covers the entirety of the administrations like Image retouching administrations, picture concealing assistance and so on.
Tag:
Parity obliges , I created photograph outcomes.
I said, earlier than starting, that it is critical to master the concept of fusion masks that I additionally provided in a preceding tutorial (because of this, I do now not return to it). As you will see in a moment, this is not about erasing the decor around the face to acquire a powerful result. The hairs, pores and skin or scales of the animal must seem progressively and best the fusion mask can attain this result.
Those who read the first part of this academic will find that many steps are the same.
The creation of this photograph faking will therefore encompass:
import the 2 pix to be processed (your face + the decor) within the same report. At that moment, you grow to be with 2 layers . Make sure that the layer together with your face is properly located over the photo to be rigged.
Position and resize the pinnacle in order that it suits perfectly into the image montage. Feel free to play at the opacity of the layers. This will substantially facilitate dimensionless and juxtaposition operations.
Create a merge mask (called a layer masks in Gimp) on the layer containing your head. Then take the brush device to color areas that should grow to be obvious or semi-transparent.
Correct if important, the evaluation, the saturation of the colours, the dominant of hue to your face in order that it fits perfectly inside the ornament.
Use localized modifying equipment (buffers, corrector, density +, density – …) to finalize the operations that could not were finished with the fusion mask (ex: a terrible junction among your face and the historical past of the photograph)
Photoshop Elements Layer Window
(1): a few areas of the pinnacle layer (which contains the face photograph), are rendered obvious or partly obvious thru the merge masks (2).
This transparency makes it viable to see the photo of the animal gift at the layer underneath (three). The image of the animal is then harassed with the face.
Layers of settings are then introduced (four) to correct differences in contrast, brightness or color which could arise between the two pictures.
Also read more,
Clipping path re-appropriate – any sorts of photograph altering, picture covering, foundation evacuation, photograph control and cutting way specialist co-op for your needs.
Tag:
Photo document codecs
If, whilst taking pictures, the selection of the recording layout of your pix is restricted (Raw, JPEG and, to a lesser volume, DNG ), it is a very extraordinary one story after a piece of retouching your pictures. To convince yourself of this , go to the File> Save as menu of your favorite photograph enhancing software and observe the special solutions available to you. Admit that there may be sufficient to lose its Latin.
I assure you right away, the report codecs to recognize in virtual images may be counted at the palms of 1 hand. These 5 codecs will let you meet all your needs inside the introduction and dissemination of your pix.
I additionally point out that I’m now not going to talk approximately Raw and DNG formats in this text for the easy cause that they’re not output codecs ( we cannot export a picture in Raw or DNG of a software program of retouching ).
One ultimate factor: for every photo, ensure to click on it to see the photograph at a hundred%. That being said, allow’s take a look at those special formats now …
Universal file layout par excellence, it’s far the first-class regarded. It is present each to your cameras and at the net.
It permits a sizable compression of the pix without massive loss of excellent, supplied to select the least crucial level of compression (see comparison beneath).
It is a commonplace layout, as properly in taking pictures, diffusion or even printing. It is therefore, read with the aid of all virtual gadgets (computer systems, cellular telephones, DVD players, tv, drugs, digital frames …)
The photos in JPEG are at once exploitable and diffusable within the nation.
It does no longer deal with layers. A photomontage together with layers and recorded in JPEG will then be “flattened” and could lose all its layers.
It does not take care of transparent areas and therefore shows white in which there’s no colour.
Due to its compression, its retouching capacity is limited ( see my article on the comparison between Raw and JPEG files ).
Example 1: this photo in JPEG layout, compressed to the maximum, has the consequences, a strongly degraded picture.
Example 2: 2d photo in JPEG layout, this time compressed at the least. The gradients and colors are well restored.
He had his moment of glory at the start of the Internet. Before the arrival of flash or video, it turned into the preferred solution for site owners to put a little animation on websites. It remains widely used these days by using avatars creators. It is likewise a compressed format but not like JPEG, it’s miles lossless and also you cannot pick the level of compression.
It therefore permits to create small animations (you’ll almost say that GIF allows the display of the distinctive layers of a photo even supposing they are no longer preserved in the document). However, be cautious with the size of the photograph that may quickly turn out to be important and pose problems of fluidity at the internet pages.
It manages the display of transparent regions.
It gives the possibility to interleave pictures, ie to show steadily its pictures which then present an increasing number of info. It was something interesting about 56k modems, it’s far a great deal less so nowadays.
It is lighter than different formats (when it does not show animations).
It handiest handles 256 hues and is therefore now not appropriate for showing images or drawings with gradients.
Example 3: this photograph in GIF layout, reveals a sturdy moire (particularly inside the sky and the combination of the diver) and a pixelization of the textual content.
Example 4: small animation Gif, displayed in a discounted length because the burden of this one could were too critical if one had stored the size of show of the alternative pictures.
Third and closing compressed document layout, it turned into created after the JPEG that it competes without delay on the internet or it’s also very gift.
Like GIF, it manages obvious areas.
It allows compression without loss of information. The photographs acquired are therefore of higher great.
The weight of the record is heavier than for the JPEG. So be careful with big pics which can sluggish down the show of pages.
It is not as generic as JPEG and is consequently no longer performed on all TVs or DVD players.
Example five: this image in PNG format, has a weight higher than all other codecs, but its pleasant is top-quality.
This is the native layout of Photoshop. It integrates seamlessly into the digital innovative workflow of the Adobe suite. This is of path the favourite layout for photographers and photograph designers.
There is no compression with loss of image. All editing work (layers, layers, selections, masks …) is retained.
It is examine by means of all picture enhancing software program.
This loss of compression also becomes a hassle because the document can quickly develop to a colossal length (numerous hundred megabytes if your image is big and has many layers)
Also tremendous, it has emerge as the standard within the own family of uncompressed image report formats. It is perfectly appropriate for printing your pics
Allows the PSD to preserve layers.
It is read by using all picture editing software (which includes image printing terminals).
It also lets in the compression of layers, with out loss of data.
I do not recognize any !
Be aware that the technical traits of TIFF and PSD codecs are almost same. So, the question of while to use the TIFF or PSD format arises …
To keep and transmit its digital pictures, one ought to of course opt for a document format this is readable by using all digital gadgets. You have the choice between two formats:
Universal format par excellence, taking over little area, it’s far best for archiving your pictures. It’s no longer for not anything that it is the default layout in your virtual cameras.
If you have selected the RAW format for shooting and / or you are retouching your pictures, the TIFF layout is flawlessly indicated. Universal, with lossless compression, it has the whole thing you want to make certain the sustainability of your paintings.
Before concluding, here’s a desk showing the feasible uses of your digital pictures consistent with the kind of record.
Also read more,
Photograph Retouching for Portrait, item or Jewelry picture. We evacuate Wrinkles, residue, Scratches and other undesirable components guaranteeing top quality.
Tag:
The example of the photos higher than speaks for itself: troublesome to mention that is that the one nighest to reality. Since we have a tendency to see the planet in color, the passage of a picture in black Associate in Nursingd white is essentially an abstraction of reality. Therefore, we have a tendency to simply perceive that we’ll be ready to use the large prospects offered by the digital to be ready to highlight a specific part of a photograph or to alter its atmosphere …
And, to try and do that sort of labor, light-weight area is nice computer code. This, for many reasons:
Since the settings applied to your pictures ar nondestructive, you’ll check totally different black-and-white conversions. This, while not risking modifying the initial image.
Creating virtual copies will enable you to match totally different conversions and choose the one that offers impactive} effect.
The tools that he proposes (colored layers) ar utterly custom-made to the belief of this sort of labor. you will even be ready to make the most of partial turning, vignetting or grain choices to convey a touch retro impact to your pictures …
I say before you begin, you’ll forget the technique of saturating your pictures (saturation slider). The result can most likely be boring and plain. If light-weight area has created a particular perform to perform these conversions, there’s a reason!
To convert a photograph to black and white in light-weight area, follow these steps:
Create a virtual copy of your image (right click on the fingernail so “Create a virtual copy). All changes can currently be applied to the current copy.
Convert the virtual copy of your exposure to black and white. To do this, you’ve got 2 solutions:
The first is to travel to the module Development then to click Black / White in basic settings (1).
Basic Settings window in light-weight area
The second is to use the predefined parameters of sunshine area (left within the development module). These are literally tiny scripts that may enable you, in one click, to use effects mechanically to your pictures (2).
Presets window in light-weight area
Then refine the reminder grey taking part in on the sliders cherish the colours you would like to switch (3). This perform, normally referred to as digital diaper mixer, is known as Black and White combine in light-weight area. as an example, if you would like to darken your sky, move the blue slider to the left, to lighten the vegetation, move the inexperienced slider to the correct, etc. If you are doing not apprehend that layer of color to switch, don’t panic. Adobe has thought of everything and created alittle tool terribly straightforward to use. merely click on the little image (4), currently position the indicator on space|the world|the realm} to be brightened or darken then click-drag to alter the colour of the chosen area. Going upwards you lighten and down, you opt for it. observe not?
Black and white window in light-weight area
If necessary, correct the distinction and tone of your image (Tone curve area). Again, you’ll modify, by click-drag, the shadows / tones of your image victimization constant tool as higher than.
Do not stop there! additionally get pleasure from the subsequent options to more modify your photo:
Vignette. Simulate the optical defects of some lenses by making vignetting from scratch.
Grain. produce a grain to convey bit|a bit} silvery touch to your image.
Partial flip. Add finally a sepia tone (value of the hue: forty in light-weight and / or dark tones then concerning thirty in saturation).
Take your photos in Raw format. you may therefore keep all the knowledge entered by your detector.
Choose the monochrome image vogue once shooting. you may be ready to read in black and white the image you’ve got simply taken and find a plan of the outcome. additionally, having chosen the Raw format can enable you, if necessary, to come back to the colour version if you’re not happy with the result.
If you’ll not get the specified result from the layer mixer, amendment the white balance (temperature and hue). this can spread the colours on your image.
I simply need to tell you before long for a replacement tutorial Photographic .
Also read more,
Clippingphotoindia – photograph retouching specialist organization close to you. We modify item, model, allure and infant by proficient retouches at modest expenses.
Tag:
From the moment you selected the non-detrimental retouching circulate to optimize your pictures, you may likely should address these famous XMP records. Why? That is what we will see later in this newsletter …
Permit’s start at the beginning: conventional picture modifying software modifies the pixels that make up the image. For that reason, those programs are called Bitmap Editors or unfavourable Retouching software.
In case you selected the uncooked layout, it’s far maximum possibly to have all of the information recorded through the sensor of your digital digital camera (APN). But the raw also has every other peculiarity: it’s far a non-modifiable record layout. It’s miles generated throughout the taking pictures and no software program is able to modify it later on. A uncooked remains a raw, regardless of the enhancing operations you practice to it. It’s miles exactly for this reason that it’s far called raw (it approach uncooked in English). Well, if a picture modifying software, something it’s far, could adjust it, it’d no longer remain raw very lengthy …
However then, how does the software to retouch the images taken in raw format? Nicely, it is very simple. If uncooked documents are not editable, there are simplest one solution: store retouching operations elsewhere. And that is where the XMP metadata comes in …
This system turned into created by using Adobe in 2001 (and sure, again!) And is at the heart of the precept of non-negative modifying.
This metadata, referred to as XMP (Extensible Metadata Platform) corresponds to lines of code of a few kilos bytes (in XML format to tell you the truth). They are associated with the picture and routinely generated via some editing software when you edit an picture. This information may be encapsulated in images (I speak approximately it a touch later) or saved in a small record attached to the picture in .Xmp when the layout of the photo does no longer allow the addition of facts (case of uncooked).
This report (.Xmp) is not without delay editable. If you click on on it, nothing will appear. This metadata consists of a number of statistics which includes EXIF information, IPTC, the call of the writer, his touch statistics, the copyright, and of course, all of the enhancing operations you can do for your photograph (shade adjustments, evaluation, sharpness …).
On the left the photograph in raw layout and at the right its XMP file containing all the changes made to the picture
To apprehend how this gadget works, I copied/pasted the XMP record of the photograph beneath retouched in Lightroom. As soon as renamed its extension in.TXT, it is then feasible to open this report in a text editor and notice what it carries. The list of commands provided via the photo editor is perfectly readable (they start with CRS :).
Thai Boxing
Consequently, we understand higher how this gadget works. While you open an image, the software goes looking for that statistics. If he finds them, he reads the commands and presentations them. Software program like Lightroom and Adobe digicam uncooked are based on this principle.
As cited above, those metadata aren’t completely reserved for raw files. Bitmaps image formats such as JPEG, TIFF, PNG, and PSD also provide this capacity to integrate this sort of metadata. On the other hand, in this situation, there is a small subtlety: the small cart document in .Xmp does not exist and the records is encapsulated immediately in the image report. That is the principle of Russian dolls in case you realize what I imply …
With this metadata, you have simply located what makes the electricity of this gadget: it’s miles the precept of non-negative retouching. Due to the fact modifications to the image are encapsulated or stored outdoor of the image, the authentic photograph is never modified. So we can have amusing trying out specific settings and go back to the previous editing with out taking the slightest chance of dropping the native model of the picture (following wrong handling for instance). Admit it is a massive plus when you need to attempt photograph modifying …
Right here are different benefits furnished by means of this gadget:
The order of the moves has no impact at the final rendering of the picture. Whether or not you have got for instance started by way of adjusting the sharpness at the beginning of the give up of your editing method does not trade the final rendering of the image.
The difference in weight between the uncooked and retouched picture is insignificant (the metadata are only some bytes). The transformed photo takes a whole lot less space on the difficult disk which allows the software program to paintings much faster. This is of route no longer the case with conventional software program or an image with multiple layers can speedy attain loads of MB.
Of direction, to benefit from these advantages, it’s far necessary to apply software program which has the opportunity of being able to integrate and read this XMP facts. And it’s now not just Adobe merchandise which can read this data. Software like Darktable, Picasa, XnView, to call a few, also provide this possibility.
Simplest while you export your picture will this statistics be completely carried out in your photograph. A brand new image within the document layout you have selected (JPEG or TIFF as an instance) is created. The unique raw or JPEG files continue to be the same as they were earlier than the export.
Yes, all non-destructive editing software program has no longer followed the XMP language to store changes to images. Most have created their personal system (DOP for DxO, COS for seize One, or PP3 for Raw Therapy).
Also read more,
Take in representation retouching in Photoshop from the geniuses. Figure out how to correct skin, hair, teeth and eyes and keep up a characteristic look utilizing Photoshop.
Tag:
Representation, on a scale, of the dimensions of the varied sensors integrated into digital cameras
But, before you detail the benefits and drawbacks associated with the dimensions of the sensors, i will be able to tell you a few time that the beneath twenty can’t understand …, namely, the film …
This was primarily based nearly solely on one film format: the twenty four × thirty six (also referred to as the thirty five mm). whether or not it absolutely was amateur or skilled photographers, color pictures, black and white or slides, all invigorated on a similar format: a negative of twenty four metric linear unit high by thirty six metric linear unit long.
To alter the silver-to-digital transition, camera makers have unbroken this format for one easy reason: to permit photographers to continue mistreatment their previous lenses. therefore I come back to the primary truth …
The first consequence is so money. The detector of AN APN, it’s just like the processor of a microcomputer: it’s what prices the foremost overpriced to provide. As a result, to create photography accessible to as many folks as potential, makers have created smaller and smaller sensors. Exit then the universal format that prevailed right there. Amateur and skilled photographers aren’t any longer tied. Here or before it absolutely was the standard of optics, film, and development that created the standard of a photograph, it’s currently the optical art – the dimensions of the detector – retouching software system that has to be taken into consideration.
The PDC is that the space of sharpness of a picture. A magnification and gap of your identical lens, this space of sharpness are going to be even larger than your detector are going to be little. it’s so not enough nowadays to own light-weight optics and opt for an oversized aperture to form a pleasant background blur, it additionally needs a detector that’s giant enough to permit the restitution.
Conclusion: nearly everything is evident once you take an image with alittle detector camera whereas an oversized detector camera will isolate an issue by making a background blur.
The blur result, additionally called the Bokeh result (boke which means blur in Japanese) is directly associated with the dimensions of the detector.
Conclusion: the transition between sharp and fuzzy areas within the image are going to be softer and progressive on a full format camera (in twenty four × thirty six metric linear unit, therefore) than on a smaller detector.
The dynamics of a detector is its ability to record a scene whose distinction is powerful (ie the distinction between the lightest and darkest areas).
The dynamics and ISO sensitivity area unit associated with the dimensions of the photosites that compose the detector.
To perceive, take the instance of a picture of twenty million pixels. These twenty million pixels come back from the twenty million photosites lining the detector. However, if this detector is tiny, it’s obvious that the photosites area unit essentially a lot of smaller than if they were on an oversized detector. These little photosites area unit less sensitive than if they were huge and plump, in order that they capture less light-weight. The electrical signal they supply should, therefore, be amplified, all the a lot of therefore because the ISO sensitivity are going to be high. it’s this amplification that’s at the basis of digital noise and also the loss of detail that you just will see on your pictures once you verify it in giant size.
Conclusion: an oversized detector device “sees” higher than alittle compact within the shadows and highlights and it will go a lot of higher in ISO before the digital noise is just too visible.

The laws of optics area unit so made: with identical focal distance, the framed field is narrower with alittle detector equipment.
Conclusion: we tend to pore more with a 50mm focal distance on alittle detector camera than on an oversized detector camera.
This too is expounded to the laws of optics: the quantity of sunshine required permanently exposure is directly proportional to the dimensions of the detector. The smaller the surface to be well-lighted, the smaller the lens.
Conclusion: with identical focal distance, little detector APN optics area unit smaller.
In the end, there’s no picture: the inventive potential and quality of pictures can clearly be higher with an oversized detector. All this has, sadly, consequences: a high price and resultant congestion. therefore it led to a draw: three points to the advantage of little sensors and three for large (although the actual fact of having the ability to zoom way is also a drawback surely forms of photos).
However, make sure to check what’s comparable. detain mind that the technological advances area unit dazzling: alittle detector camera of the newest generation can in all probability provide higher photos than a tool with a detector a touch larger from a previous generation and United Nations agency is already a number of years.
I may additionally tell you concerning the width/height quantitative relation that’s completely different reckoning on the chosen detector. however what’s a plus and that one a disadvantage? It’s a lot of a story of style than the rest …
Before closing, here may be a table that lists by kind of devices, the various sizes of sensors that may be found nowadays on the market.
If you’re searching for a camera, it’s doubtless that it’s to require higher photos than your phone. the dimensions of the detector is so crucial. permit a minimum of one 1-inch size detector. Below, the distinction in quality between APN and phone are going to be nearly impalpable.
Finally, it’s amusing to notice that it’s digital cameras or film cameras, the points mentioned on top of area unit still relevant. AN previous and huge glass plate quite 100 years previous and dead preserved continually offers pictures of top quality, superior to the pictures delivered by the telephones of nowadays.
Also read more,
Proficient Image retouching administrations, 100% Quality Guaranteed attempt it free for 24 hours. Guarantee best quality extraordinary assistance with best cost.
Tag:
